Microscope and Microscopy Class 9 Notes Advanced Science Chapter 9
Reviewing Class 9 Advanced Science Notes and Chapter 9 Microscope and Microscopy Class 9 Notes regularly helps in retaining important facts. Microscope and Microscopy Notes Class 9 Advanced Science Class 9 Microscope and Microscopy Notes The Microscope It is a special instrument used to observe tiny living organisms or their parts that cannot be seen […]
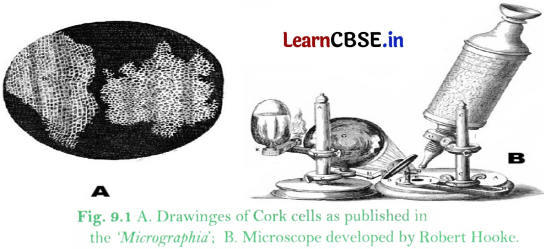
ReviewingClass 9 Advanced Science Notesand Chapter 9 Microscope and Microscopy Class 9 Notes regularly helps in retaining important facts. Class 9 Microscope and Microscopy NotesThe MicroscopeIt is a special instrument used to observe tiny living organisms or their parts that cannot be seen with the naked eye. The word microscope comes from micro (small) and skopion (means of viewing). It is used to see small specimens such as onion cells, cheek cells, bacteria and dust particles. It helps doctors to see germs and study cells in living organisms. Limit of Resolution of the Human Eye When viewed from about 25 cm, two points separated by about 0. 1 mm (100 micrometres) can be seen as distinct. Points closer than this appear as a single point. A cell is generally too tiny to be seen by the naked eye. This is why a microscope is needed to study cells. Robert Hooke (1665) examined thin slices of cork and saw tiny hexagonal box-like spaces. He called them cells. He published his findings in a book called Micrographia. Antony van Leeuwenhoek (1670s) observed bacteria and Protozoa using powerful single-lens microscopes. He called these organisms animalcules. A Quick Historical Journey of Microscopes13th to 15th centuries: Simple magnifying glasses were used by spectacle makers. 1590: Hans and Zacharias Janssen (Dutch father and son) developed an early compound microscope by combining two lenses within a single tube. 1665: Robert Hooke coined the term cell after examining cork under a microscope. He published Micrographia. 1670s: Antony van Leeuwenhoek used a single-lens microscope with up to 300X magnification. He was the first to study living microorganisms. He is called the Father of Microscopy. 1878: Ernst Abbe proposed a mathematical theory linking resolution to the wavelength of light. 19th to 20th century: Better lenses and improved illumination improved the compound light microscope. 1930s onwards: Electron microscopes (TEM and SEM) were invented. Viruses, cell organelles and cell surfaces could now be observed. 1938: Ernst Ruska developed the first electron microscope. It used electrons instead of light, which gave shorter wavelengths and better resolving power. 1953: Frits Zernike received the Nobel Prize in Physics for inventing the phase-contrast microscope. Working of a MicroscopeA microscope works by enlarging very small objects that cannot be seen with the naked eye, allowing scientists and students to observe tiny structures in detail. Magnification refers to how much bigger the image appears compared to the actual object, making it possible to study very small specimens like cells. Resolution is the ability of a microscope to show fine details clearly; higher resolution produces a sharper and more detailed image. Contrast helps in distinguishing the specimen from its background, which makes different parts of the object easier to see and study. Microscopes can use either light or beams of electrons to form images, depending on the type and level of detail required. A system of lenses or electromagnetic fields focuses and enlarges the image, producing a clear and detailed view of the specimen for observation. Types of Light MicroscopesLight (optical) microscopes use visible light and glass lenses to enlarge and view specimens. → Basic Classification:Simple Microscope: Uses a single lens to magnify an object, similar to a magnifying glass, e. g. dissecting microscope, used for 3D viewing of small objects. Compound Microscope: Most commonly used laboratory microscope. Uses at least two sets of lenses: the objective lens (near the specimen) and the eye piece (ocular lens) for high magnification. → Advanced Optical Microscopes:Fluorescence Microscopy: Uses high-intensity light to excite specialised dyes in a specimen. Specific cellular structures glow brightly against a dark background. Phase-Contrast Microscopy: Used for viewing living cells in their natural state. Enhances contrast without using chemical stains that would kill the specimen. Parts of a Compound MicroscopeCore components of a compound microscope and their roles are as followsLight Source: Provides illumination (LED or halogen lamp). Condenser Lens: Focuses light onto the specimen to optimise numerical aperture and contrast. Specimen Stage: Holds the slide containing the specimen. Objective Lens: Primary magnifying lens (e. g. , 4X, 10X, 40X, 100X). Forms an enlarged, inverted real image of the specimen. Eyepiece (Ocular Lens): Enhances the magnification of the image already produced by the objective lens. → Detailed Description of Each Part:Objective Lenses: Main magnifying lenses with different magnification powers (4X, 10X, 15X, 20X, 40X etc. ) placed close to the slide. Form a real, magnified image of the object. Eyepiece (Ocular Lens): It is the point where the eyes are placed. Acts like a magnifying glass for the image formed by the objective. Together, both lenses produce a greatly enlarged image. Body Tube: A hollow tube with the eyepiece and objective fitted on its two ends. Revolving Nosepiece: Holds objective lenses and allows switching between them. Stage and Clips or Mechanical Stage: Platform to hold the slide in place. Condenser Lens: A convex lens that focuses and concentrates light on the specimen to optimise numerical aperture and contrast. Substage Diaphragm: Controls the amount of light transmitted onto the specimen. Coarse Adjustment Knob: Large knob for rough focusing at low power. Fine Adjustment Knob: Small knob for sharp focusing at high power. Arm and Base: Provides structural support. Always hold the microscope by the arm while supporting the base. Light Source or Mirror: Provides light that passes through the specimen or reflects light onto it. → Working of a Light Microscope:Refraction is the bending of light as it passes through glass due to a change in its speed and a convex lens uses this principle to bend light rays so that they meet at a point and form a magnified image. The objective lens, which has a short focal length, is placed close to the specimen and forms a real, inverted, and magnified image when the object is just outside its focal point. The eyepiece, which has a longer focal length, takes the image formed by the objective lens and magnifies it further so that it can be viewed clearly by the observer. The final image seen through the microscope is virtual, upright, and highly magnified, making it easier to study fine details of the specimen. Permanent SlidesTemporary mounts are useful for a short time only. The water slowly dries up and the living cells start shrinking and dying. If a temporary mount of an onion peel is left for a few hours, air bubbles, crystals of dried stain and distorted cell shapes will appear instead of fresh, clear cells. Permanent mounts are made to keep well-prepared slides safe for many years so that future batches of students can use them. The slides stored in slide boxes in the school laboratory are usually permanent slides preserved using a special technique. → Steps to make a Permanent Mount:Fixation: The specimen is treated to kill it and preserve its structure. Staining: Dyes are applied to make cell structures clearly visible. Dehydration: Any water content present is removed from the specimen. Mounting: The specimen is sealed under a coverslip using a special medium such as Canada balsam or DPX. This prevents the specimen from drying, rotting or being attacked by microorganisms. Once prepared properly, a permanent slide can be stored and used repeatedly without losing clarity. → Calculating Magnification:Magnification tells us exactly how many times bigger the image is compared to the real object. Magnification is represented by the symbol X. For example, 10X means magnified ten times. Formula: Total Magnification (M) = m0 x memo = magnification of objective lens, me = magnification of eyepieceExample: 10X eyepiece and 40X objective gives a total magnification of 10 × 40 = 400X. Real size of the object = Image size divided by total magnification. Types of MicroscopesAll microscopes magnify small objects but they work differently and can see different levels of detail. Magnification and resolution are the two core concepts that define the imaging capabilities of a microscope. The size of the specimen and the purpose of observation determine which microscope is most suitable. → Magnification vs. Resolution:Magnification: The factor by which a microscope enlarges the image of a specimen relative to its actual size. For example, 400X. Resolution: The smallest distance between two very close points in a specimen that can be clearly seen as separate. Expressed as a unit of length, e. g. , 0. 2 micrometres for a light microscope. Higher resolution gives a sharper image. Resolving Power: The capacity of the microscope to clearly identify two closely placed points as separate. It is the reciprocal of resolution. Smaller resolution = higher resolving power. Note:More magnification is not always better. A large but blurry image is not useful. Both good magnification and good resolution are required. → Resolution of Different Instruments:InstrumentResolutionHuman Eye~1 × 10⁴m (about 0. 1 mm)Light Microscope~2 × 10⁷m (about 0. 2 micrometres)Electron Microscope~2 × 10¹⁰m (about 0. 2 nm)Light (Compound) MicroscopeThese use visible light and glass lenses. Magnification up to about 1000X to 1500X. Resolution about 0. 2 micrometres. They can observe living cells such as moving Protozoa or cheek cells. Electron MicroscopesThese use electron beams instead of light. Electron beams have extremely short wavelengths (about 0. 005 nm compared to 550 nm for visible light). Shorter wavelength means better resolution. Electrons are accelerated in a vacuum and directed using magnetic lenses (electromagnetic coils). Electromagnets act as lenses to focus the electron beam. Source of electron beam: tungsten filament. Cannot be used to observe living cells as the vacuum kills them. → Units of length used in microscopy1 cm = 10 mm1 mm = 1,000 micrometres1 micrometre = 1,000 nm (nanometres)Transmission Electron Microscope (TEM)They are much more powerful than the light microscope due to better magnification and resolution. These operate with a beam of electrons rather than light. Extremely thin slices of the specimen (about 50 to 90 nm thick) are prepared using an ultramicrotome equipped with a glass knife. Electrons pass through this ultra-thin slice of the specimen. Heavy metal stains are usedUranyl acetate for proteins and nucleic acids. Lead citrate for lipids and carbohydrates. These stains increase electron density through positive staining and provide contrast without dissolving in embedding resins. Shows internal cell details such as mitochondria, ribosomes and viruses. The image produced is two-dimensional (2D). Resolution is of about 0. 1 nm. Resolution is of about 1 to 20 nm. Scanning Electron Microscope (SEM)These operate with a beam of electrons rather than light. Unlike TEM (which uses ultra-thin sections cut by glass knives), SEM uses diamond knives for thicker sections or whole mounts. Heavy metal coatings (such as gold or palladium) are applied to provide electrical conductivity for the electrons. Electrons scan and are reflected from the surface of the specimen. Produces 3D-like images of surfaces such as pollen grains, insect legs, and microchips. → Comparison between Light Microscope, TEM and SEM:FeatureLight MicroscopeTEMSEM1. Illumination sourceVisible lightElectron beam (broad)Electron beam (focused, scanned)2. Types of lensesGlass (convex, achromatic)Electromagnetic coils (condenser, objective, projector)Electromagnetic coils (condenser, scanning, objective)3. Thickness of sectionUp to several mm for whole mounts; 5 to 10 micrometres for tissue sectionsUltrathin (less than 100 nm, typically 50 to 90 nm via ultramicrotomy)Surface only; samples 20 to 30 mm thick; coating 10 to 100 nm4. StainingBasic dyes (e. g. , methylene blue, eosin; light-absorbing)Dense metal compounds such as uranyl acetate and lead citrateConductive coating (e. g. , gold or palladium; no traditional staining)5. Observing living cellsYes (e. g. , pond life, cheek cells)No (vacuum kills cells)No (vacuum and coating kills cells)6. Resolution~0. 2 micrometres~0. 1 nm or better~1 to 10 nm7. MagnificationUp to 1,500XUp to 50 million XUp to 2 million X8. Sample preparation timeMinutes (simple mounting)Hours to days (embedding, ultramicrotomy)Hours (dehydration, coating)9. CostLow (approx. Rs. 10,000 to 50,000)Very high (Rs. 50 lakh and above)High (Rs. 20 to 50 lakh)10. Vacuum requiredNoYesYesUses of MicroscopesThe uses of microscopes are as followsHospitals and Pathology Laboratories: Diagnosing diseases by checking blood, sputum and tissue biopsies. For example, detecting malaria parasites in blood. Science Laboratories: Studying stomata, plant and animal tissues and plant diseases. Industry: Checking quality of metals, plastics and electronic chips using light and electron microscopes. Police and Forensics: Examining fibres, hair, glass fragments and blood stains from crime scenes. Environment: Checking water samples for algae, Protozoa and pollution indicators. New Developments and Limitations in Microscopy→ New Developments:New developments in the field of microscopy are listed belowDigital Microscopes: Show real-time images directly on a screen. Live images can be shared with all students at the same time. Super-Resolution Microscopes: Can see details smaller than the normal limits of light microscopy. → Limitations:Some of the limitations of microscopes are as followsLight microscopes cannot resolve structures smaller than about 0. 2 micrometres due to the diffraction limit of light. Electron microscopes are very costly and require a vacuum. Most samples for electron microscopy must go through lengthy chemical processing (fixation, dehydration, embedding, staining or coating) before observation.